Friday, 8 May 2009

Gift Albums

This 90th birthday album for my grandmother is the 3rd gift album I have done and definately my best. I am not going to tell you how to make your own one, but rather tell you how I made mine and hopefully pass on some handy himnts to you. I am only uploading these now even though I finished it over 3 weeks ago as the album was missing in the post and finally arrived today. I am so relieved and my Grandmother loves it. I won't be uploading the whole LO here, but rather a few of my favourites.

The first page of the album was the very last page I made. It is important to me that all journalling is made from the heart and I thought the best way to start the album was with a letter to her.

I found it quite hard going when you have so many LOs to do and only have a limited amount of time to do it in, but I found a fantastic solution. There are so many wonderful patterned papers around these days that you can make a very beautiful page with very little effort. This is from the papermania olive collection and all I did to this page was add the photo, title, ricrac and from a second identical paper I cut out some of the flowers and then stuck them on foam pads to give them a 3D effect (hard to see in a photo) I used this technique on quite a few of the LOs.
I had quite a few photos which I didn't know when they were taken or exactly where, so instead of leaving no journalling at all I wrote about how the photo made me feel and what I could see in it.
Weaving is a technique that is quite quick but can be really effective. I tried to use flowers here that matched her bouquet and then chose pink to make the page feminine and added a stamped flourish.
I wanted to use a poem about mothers in her album because although she's not my mother it is so much a part of who she is and of course the way she raised my mother led my mother to be the person she is who raised me and taught me to be the mother I am (Well done if you followed that) The poem comes from the wonderful resources on sb.com.
I changed my mind a million time about colours, I first decided to stick with a theme throughout the album, as I have done in previous gift albums, but then I got bored. I decided then that I would stick to dull colours to match the black and white photos, but this one just wasn't dull, it was such a happy family photo, it just had to be bright, so I decided to let the photos talk to me, and I love how this page turned out. The flowers are stamped and then I coloured them in.
These colours were so beautiful that the LO needed little more than the layoured paper. The quote, again from sb.com, for me, said it all.
This was the very first page I did for the album. I spent I huge amount of time doing delicate bead work, but when this page was finished I realised that there was no way i was going to be able to spend this amount of time on 20 pages. I would never have finished.

This Lo was a lift and the lovely quote came from Lou on UKS. I really love the way the doodles turned out and it is such an easy and quick way to fill a space.

I think the best way to finish a gift album is to let the recipient finish it themselves. At her actual birthday party my mom ensured a photo was taken of all the family together and that will be the very last page of her album.
This album took me a lot of time and I was so sad to be so far away and unable to share her 90th with her, but I really hope that this album will show her what a wonderful woman she is and what an outstanding life she's had and more than anything else, i hope she will never doubt how loved she is.
Thanks for looking xx

Saturday, 2 May 2009

AND THE WINNER IS!!!!!!

kimmie_35

Thank you to everyone who took part, it has been a lot of fun reading all your comments and some of them really made me laugh.

Kimmie be sure to let me have your postal address :) You can pm me on UKS if that's easiest.

Happy Scrapbooking Day!!!!!

To celebrate national scrapbooking day, I decided I'd give away a little blog candy. All you have to do is leave a comment telling me what you are doing to celebrate NSD and around 8pm this evening UK time, I'll pick a name and send you a little something scrappy.

Here's my latest LO

Friday, 10 April 2009

Easter Prelude and gift boxes

Seeing Liam was at home all week I decided that doing some Easter crafts together would be fun. The first thing we did, which was a great success was to turn a paper plate into a bunny. We were so pleased with our bunny we didn't let the paint totally dry before taking this photo :)

Or next job was to set out making cards for his 5 grannies (3 of them are great grannies) and his teachers. I drew the outline of eggs onto shrink plastic and he then decorated them with permanent markers. Once we had shrunk them we attached them to cards and added paper, pompoms, gems... pretty much what ever Liam could lay his hands on that I allowed.

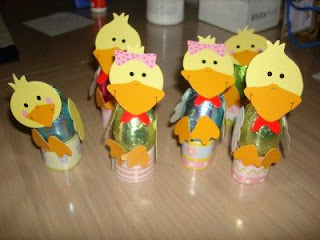
These cute chickens arrived as a kit from my Mom. They are suppose to be for decorating real eggs, but I decided chocolate eggs were a better idea. Each piece is stuck to the egg with a sticky foam dot. I helped Liam with the first couple and then let him get on with it and some of them looked very funny, but he had a lot of fun.

Gift Boxes

These could be made for any occasion. Decide how big you want your gift box to be. You can make it from scratch or like I did by cutting the bottom off an existing box (Great way to recycle lol )

Choose papers suitable to the occasion and then tear them into pieces. I use normal craft glue and mix it with water. I paint the watery glue onto the box and the stick the papers on. As I stick the papers I paint over the top of them as well. It ensures they are well stuck as well as giving it a shiny finish. Leave to dry completely.

Fill the boxes with what ever treats you like arranging them nicely. Cover the whole box with plastic and secure with sellotape underneath. The photo below shows 2 different size boxes both done in the same way.

After I had filled the boxes they looked empty so i decide to bake some biscuits which didn't go according to plan and took me late into the night. TIP - try all the contents of your box in the box before you start decorating.

Happy Easter Everyone!!!

Monday, 30 March 2009

Scrap Pack

Well seeing this was the final scrappack ever I decided to write about it.

I discovered the scrappack challenge on scrapbook.com in May last year. Basically you pay $8 to receive a bag of mixed goodies, some scrap booking stuff, some not. We have had some really interesting goodies over the last year. In 1 way or another you have to use every item on your LO and the only thing you may add is paper, glue, ink and paint. About half the money you send covers the items and the rest goes into the prize fund.

Sadly due to the happy fact that our leader is expecting, the scrap pack can no longer carry on.

Here are the items which were in the March Scrappack:

This is my March scrappack LO:

This is what I did with the pack items:

silver heart charm - Is upside down in the binder at the top of the lighthouse. floss - Used as waves in the sea and also in the hidden journalling tag. buttons - 1 big white one at the top of the light house in the clip, the other 14 are scattered on the seashore as rocks. confetti hearts - painted black and used to decorate the sails of the boat. map - inked brown and cut into boulders on the seashore. index divider - painted white and used to make the lighthouse. tea bag - The tea is used as the sand on the shore and the bag was cut to make the clouds. shipping tags and wire - the first 1 was used to make the sails of the boat and the wire is the ropes, the second tag was used for hidden journalling and the wire to make the rays of light from the lighthouse. binder clip - painted white and used at the top of the lighthouse. sandpaper - Used to make the boat, the roof of the lighthouse and also for scratching along the bottom of the photo

Here are some close ups of the making of the lighthouse and boat:


I won second place for most creative, sadly no prizes for second place lol

Thursday, 26 February 2009

Acetate holiday

It is impossible to show in a photo what I did here, so hopefully with the help of a video I can explain.


  • Start by cutting 4 pieces of paper the exact same shape and size.
  • You can then design anything on your 2 out side pages.
  • On the acetate which goes in the middle you can do anything you want as long as it is exactly mirrored on the back. I choose to do very little on my acetate as I like the design from the page below to show through.
This is the photo of the 2 outside pages:


And here is a short and not very good video of what it looks like in my album with the acetate in the middle.

Monday, 23 February 2009

I Choose to be happy!!!

Ever since I came back from South Africa in mid-January I just can't shake the blues, everything seems to get me down and it feels like as hard as I try to make things go right they just go wrong. By Friday last week I had lost 1.2 kg since the beginning of the week, but after 2 days of weekend and not being very bad, I've put back on what I lost and extra. It seems like the more I try to be a good mother, the more aware I become of my failings... it is a vicous circle. The more down you are the more negative you feel towards your surroundings and in turn this makes you feel more down and it is so easy to spiral towards a place where there is no joy. I feel unmotivated, energyless and miserable... Today I have decided I am going to be happy!!!!!!!!!!

Yes there are things in life that get me down, but there are also many many things for me to be happy about and these are going to be my focus. So what if I don't clean my house for one day because I decide to build puzzles with my children instead. So what if my lanudry basket is full because I decided to scrap, I'm not saying I'm not going to do the things that need to be done, I'm saying I'm going to be positive about doing them and when I feel weighed down, I'll take a break and do something that makes me smile.

The things that get me down:
  • The laundry basket which is NEVER empty.
  • A sink that makes dishes appear the second you turn your back.
  • The dust that just won't stay away.
  • The meals that constantly need cooking.
  • The kids that need feeding, cleaning, noses, nappies, hands...
  • The toys that are always on my floor.
  • When the children don't listen to me or do things that make me angry.
  • When I get angry.
  • My weight.
I could go on and on, but I think the thing that gets to me the most is that no one knows how much I do, nobody notices the little things and nobody praises me for my efforts, the result - I start to doubt my own ability and if I'm not a good wife and mother, then I have no worth.

BUT... I choose to be happy

I know my family love me, and although they don't see the small things like the removal of stains, the extra effort I made in vacuming, the little extra spice I added to dinner, they appreciate the whole package and they know they are loved and cared for.

I choose to be happy!!!

These are some of the many things in my life that make me happy:
  • I am loved deeply by a good and honest man.
  • I have 2 of the most gorgeous boys ever.
  • I am able to not work and be in the home.
  • I am healthy.
  • We have enough money to have what we need and some luxurys.
  • I have a nice home, even if a bit small, we are happy here.
  • I have parents and siblings who love and care about me.
  • I have good friends who I can talk to.
  • I am able to scrap to save my precious memories.
  • I have dreams for the future.
Most importantly: I like who I am. I like that high morals I have and the adult I have become. I like my life, my family is my world and I will do anything for them and that includes the boring jobs.

I choose to be Happy!!!

If you read this blog, I challenge you to make your own blog entry along these lines. List what gets you down and the things that make you smile and then CHOOSE to be happy!!! Writing this all down has made me feel so much better and now I'm ready to start my day and clean my house. However, I think I may take a break to turn this into a LO.

Friday, 20 February 2009

My WISH for u

This LO didn't take me very long, but actually made me cry while I was doing the journalling. It is so hard to imagine that 1 day, my precious baby is going to be a man. All I can hope for my sons is that they will be happy and healthy adults and I pray that they will be good and upstanding men like their father.


My LO is based on the following sketch by the awesome Q-diggity.

Here are a couple of close up to show my really cool supplies, how I love scrapping supplies :)


Thursday, 19 February 2009

Christmas tree

So many people have asked me how I made the Christmas tree on my Santa LO, I decided to write the instructions down for those who are interested. Firstly I must say that the idea was not mine and the credit goes to the lady who runs the crop I attend.


1. Start by cutting a traingle shaped piece of card which is the size you'd like your xmas tree to be.


2. Then cut strips about a cm wide and 10 cms long. It's quite nice to not have then all the exact same width. They can be all the same colour or different colours and patterns. (If you are having a very small tree, you may need to asjust the size of the strips.)


3. Fold your strips in half but don't push the fold flat. Use double sided tape to start sticking your folded strips. Start at the bottom and work your way up.


4. When you don't have enough space left for another row, cut a triangle to fit the space which is left.


Hope this is helpful, if anything is not clear feel free to ask me. The photo below should give you a clearer idea of how the fold and stick the strips.


Wednesday, 18 February 2009

Here I am

I have been wanting to start a blog for ages, well now I've done it and I have no idea what to write about. I think this will be my little spot for my nutty ramblings, sharing my highs and lows as a mom and sharing the joy that scrap booking brings me as well of some of my creations that I am extra proud of.


Thanks for stopping by!!!

I just chose a recent photo of the boys at a party, so I could experiment with my blog.